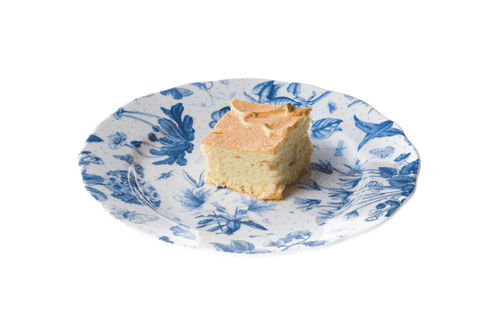

Rainbow sponge cake
12 servings
120 minutes
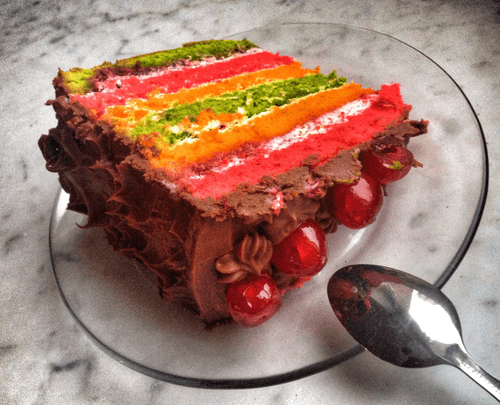
Rainbow sponge cake is the embodiment of celebration and joy on your table. Its history traces back to traditional Russian sponge cakes, but the bright colors and airy texture give it a modern and playful character. This dessert captivates at first glance with its colorful layers soaked in cherry syrup and delicate sour cream frosting. The creamy layer makes it surprisingly soft and juicy, while the chocolate glaze adds a noble finish. Topped with candied cherries, it not only pleases the eye but also offers a rich, harmonious taste — the sweetness of vanilla, freshness of fruits, and tenderness of cream. Perfect for special occasions as its stunning presentation turns any day into a celebration!
1
Take 4 eggs, separate each egg into whites and yolks, and place them in tall containers. Whisk the yolks until they are as white as possible, then add 75 grams of sugar and continue whisking until thickened. Whisk the whites until fluffy, and carefully, as all cooks like to say, sprinkle in the remaining 75 grams of sugar in a thin stream while continuing to whisk. Well-beaten whites should not spill out of the bowl but come out as one large white piece. Preheat the oven to 170 degrees.
- Chicken egg: 12 pieces
- Sugar: 700 g
2
Mix half of the whipped egg whites with the yolks and add flour to the mixture; beat on low speed until a uniform sandy-colored mass is obtained. I use food colorings to tint the dough; instead, natural colorings can be used: fresh beet juice for red, carrot juice for orange, a few drops of green dye for green. Add the coloring to the mixture of egg whites, yolks, and flour and mix until the color is even. Gently fold in the remaining egg whites into the colored yolk-white-flour mixture with slow and careful movements. It is very important to mix gently so that the bubbles in the whipped egg whites do not burst. If the dough color is uneven—don't worry; it will even out during baking.
- Wheat flour: 500 g
- Food coloring: to taste
- Vanillin: to taste
3
Grease the baking pan with butter and sprinkle with flour, pour the prepared batter into the pan. Bake each layer for 20-25 minutes (it depends on the size of the baking pan, mine is a 21 cm diameter removable one). Usually, while the first layer is baking, I prepare the batter for the second; while the second layer is baking, I prepare the batter for the third — you should get the idea. After each layer cools, I cut it in half (if the top of the layer is too domed, I trim it as well).
- Butter: 200 g
- Wheat flour: 500 g
4
The filling cream is made easily. Mix all the sour cream with 200 grams of sugar and vanillin; if you like it sweeter, you can add more sugar (I don't add vanillin because I don't like its smell in the cream). We assemble the cake. Soak the first layer in cherry (or other) syrup first, spread cream on top, cover with a layer of cake; I just coat this one with sour cream (don't skimp on the cream; without it the cake will be dry), next layer again syrup and then cream. This way a colorful tower is assembled. Set it in the fridge to let it set and soak properly.
- Sour cream 35%: 900 g
- Sugar: 700 g
- Cherry syrup: 100 ml
5
Cream for 'finishing work'. In a water bath (a pot on the stove with boiling water, into which a metal or ceramic bowl is placed), melt the chocolate, add 150 grams of butter, and mix until smooth. Remove from heat and add condensed milk, mixing again. The cream should be thick and gooey. Take the cake out of the fridge and coat it completely with the chocolate glaze. Decorate with candied cherries. Don't forget to put it in the fridge to let the cream set (you can decorate the cake with candied fruits, coconut flakes, or the same sour cream as inside — anything your imagination can come up with in this endeavor).
- Milk chocolate: 200 g
- Butter: 200 g
- Condensed milk: 150 g
- Cocktail cherry: 100 g